***
My store is not taking any orders today due to health reasons which limit to my productivity.
***

My custom harmonicas, combs and tools are made to order. If items are out of stock on my website, it's likely due to my workload is at the limit. Please see my dealers for all items I offer.
Maximum production times may be up to 16 business days for combs and tools. Current production time for custom harmonicas are shown on the top of the custom page.

Thanks for your support.
Andrew

(Checklist) Basic embossing

This is part of a series of checklists I am making available to you.

Click the "Printer-friendly version" link at the bottom of the page and feel free to print out as many copies as you like!
----------

Basic embossing checklist
(Half slot embossing)
version 2016/12/13

Items needed
___ Tools to disassemble the harmonica (screwdriver)
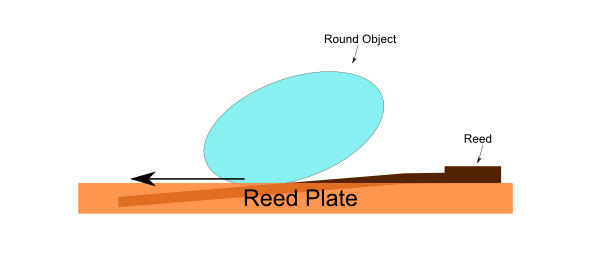
___ A hard round object (Example, a chrome-plated socket) or a specialized Embossing tool
___ Plinking tool
___ Reed work or gapping tool
___ Reed wrench
Prep work
___ The harp is airtight
___ The reed shapes are favorable
___ Gaps are set
___ The harmonica plays well (Embossing will never, ever fix a problem)
Embossing
___ Take the harmonica apart
___ Lay reed plates reed-side-up on a flat surface
___ Press the Embossing tool or round object into the middle of a slot. Advance to the tip (not the base) using gentle downward force
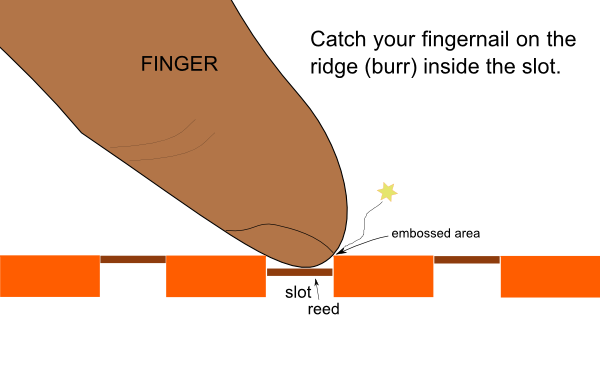
___ Use your fingernail to feel for a catch on the inside of the slot. If none is present, repeat the previous step with slightly more downward force.
___ Plink the reed to make sure you didn't use too much force and over-do it.
___ Repeat the process for the other slots

Troubleshooting
___ If the reed won't plink, consider reed alignment.
___ If you embossed too much, apply pressure to "un-do" the embossed ridge using the reed tool or the plinker. Look through the slot and press the tip of the reed through. Can you see where the reed is contacting the slot? Apply gentle pressure to the slot wall in that area.